Hiện thực wizard trong Odoo
Tut 10: Wizard

Odoo Tut 10: Wizard
Trước khi xem bài viết này, bạn vui lòng hoàn thành hướng dẫn ở Tut 8: Thừa kế controller trong Odoo hoặc download mã nguồn ở cuối bài Tut 8.
Bài viết này sẽ hướng dẫn bạn:
- Wizard trong Odoo là gì?
- Hiện thực / customize wizard
Wizard trong Odoo là gì?
Để customize (hoặc thêm mới) được thành phần trong Odoo, bạn phải biết thành phần đó nằm ở đâu, cách tạo mới như nào. Wizard trong Odoo nó là gì? Có ăn được không, và khi nào cần dùng đến. Câu trả lời đó là khi bạn cần xử lý trên nhiều record dữ liệu (nhiều hàng trong bảng / model) cùng lúc, để thực hiện thao tác như cập nhật hàng lọat, kết xuất báo cáo, … hay bất cứ một thao tác thần thánh nào đó bạn có thể nghĩ ra khi nắm rõ cơ chế hoạt động của wizard trong Odoo.
Nếu chưa hình chung được mô tả "chém chuối" phía trên thì bạn nhìn hình sau là hiểu ngay; tạo mới một wizard sẽ cho phép thêm một action khi multiple-selection các hàng:
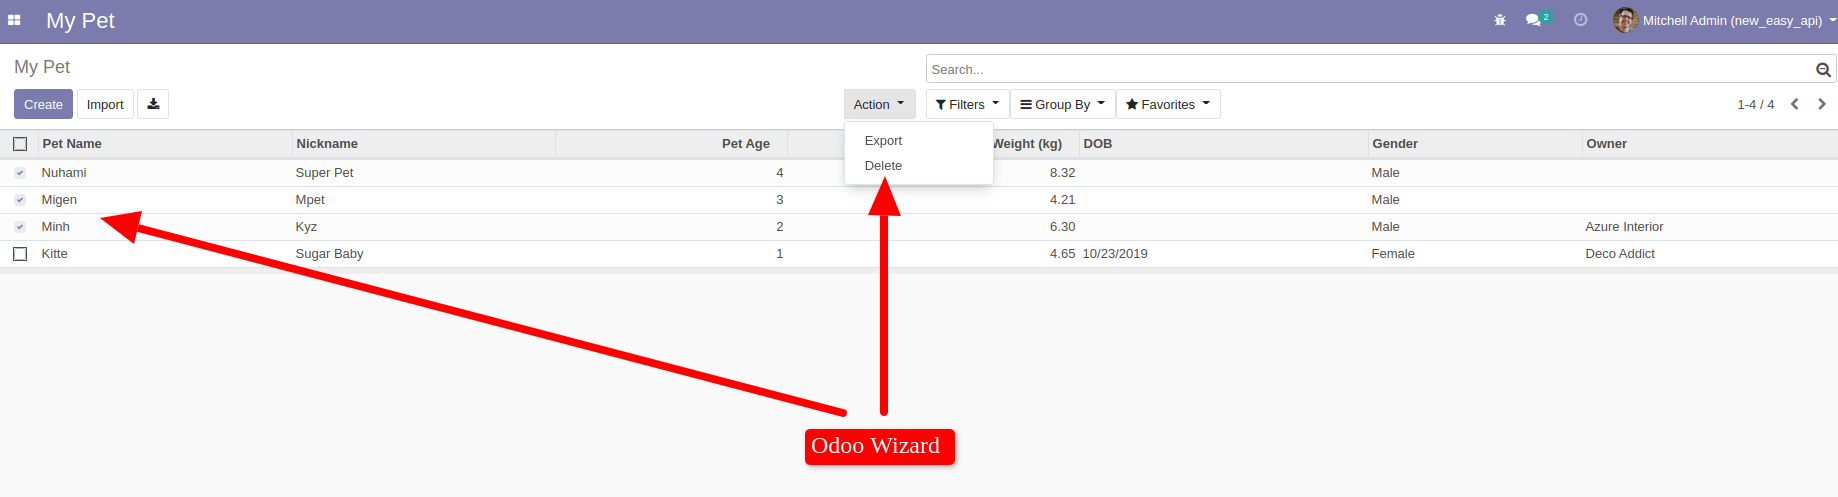
Ảnh. Wizard trong Odoo
Cơ chế hoạt động của wizard trong Odoo:
- Multiple selection các hàng sẽ hiện ra danh sách các action, mỗi action tương đương một hiện thực wizard.
- Click vào action sẽ kích hoạt giao diện cho phép điền thông tin (form).
- Dữ liệu điền vào form trên sẽ đổ vào một transient model (class odoo.models.TransientModel) - model tạm / bay hơi => dữ liệu trong model này không được lưu bền vững, các dữ liệu cũ sẽ được xóa dần; rất thích hợp để lưu tạm.
- Ngoài ra, trên form cho phép hiển thị button để gọi vào phương thức (method) trong transient model (có truyền các ID của record được chọn) để thao tác trên các record đó.
Hiện thực / customize wizard
Đối với wizard trong Odoo, customization phổ biến nhất đó là nhu cầu tạo mới một wizard đặc thù business. Minh sẽ hướng cách tạo mới một wizard trong Odoo.
Cấu trúc một wizard trong Odoo:
- Model: hiện thực transient model (form pop-up)
- View: hiện thực action (act_window) để hiện thị form pop-up
Hướng dẫn hiện thực mình sẽ đi cụ thể vào một wizard đó là update trường (field) cho nhiều record thú cưng một lúc, tức multiple update thay vì đi từng dòng record để sửa, giá trị field update đương nhiên sẽ giống nhau cho hàng lọat ^^~.
OK, let's gooo:
Tạo folder wizard
Tạo mới folder wizard @ mypet/wizard -> import folder này file init (xem ảnh dưới)
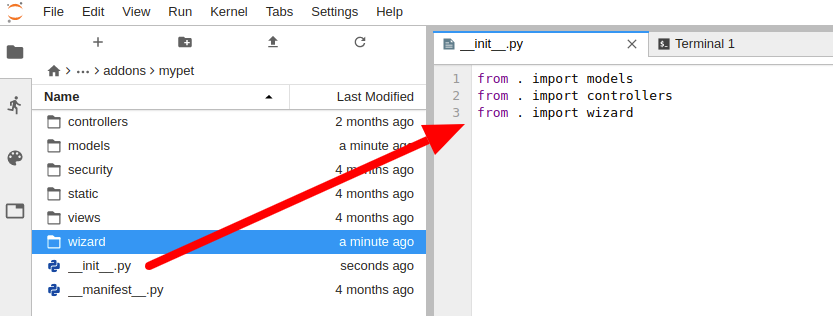
Ảnh. Tạo mới và import folder wizard
Cấu trúc chuẩn Odoo wizard
Tạo 2 file trống theo đường dẫn sau:
- mypet/wizard/batch_update.py: model "bay hơi" của wizard => ta sẽ hiện thực business logic trong này nè :D.
- mypet/wizard/batch_update.xml: view của wizard (form pop-up)
Nhanh chân import model và view vào init + manifest nha.

Ảnh. Cấu trúc Odoo wizard
Hiện thực wizard model
Mình sẽ hiện thực batch update wizard như sau:
- Form cho phép điền một số trường sẽ overwrite hàng loạt lên các record(s): dob, gender, owner_id, basic_price. Do đó model của wizard ta cần phải khai báo các field này -> ta chỉ việc cópy bên model my.pet.
- Dĩ nhiên làm khi nghiệp vụ khác bạn có thể tạo thêm những field khác tùy ý, không nhất thiết phải là những field trong model mà wizard đang tương thích như ví dụ này!
- Hiện thực method multi_update(), khi click vào button trên form (hiện thực ở bước sau) sẽ gọi method này thực hiện logic của ta. IDs các record được chọn trong bảng my.pet sẽ được truyền vào context -> truy xuất ra bằng cách
ids = self.env.context['active_ids']. - Ta chỉ overwrite giá trị khi field điền lên form khác False (mặc định) -> logic Minh quy định trong ví dụ này là vậy :).
mypet/wizard/batch_update.py
# -*- coding: utf-8 -*-
from odoo import api, fields, models, tools, _
from odoo.exceptions import UserError, ValidationError

import logging
_logger = logging.getLogger(__name__)

class BatchUpdateWizard(models.TransientModel):
    _name = "my.pet.batchupdate.wizard"
    _description = "Batch update for my.pet model"

    dob = fields.Date('DOB', required=False, default=False)
    gender = fields.Selection([
        ('male', 'Male'),
        ('female', 'Female')
    ], string='Gender', default=False)
    owner_id = fields.Many2one('res.partner', string='Owner', default=False)
    basic_price = fields.Float('Basic Price', default=0)

    def multi_update(self):
        ids = self.env.context['active_ids'] # selected record ids
        my_pets = self.env["my.pet"].browse(ids)
        new_data = {}

        if self.dob:
            new_data["dob"] = self.dob
        if self.gender:
            new_data["gender"] = self.gender
        if self.owner_id:
            new_data["owner_id"] = self.owner_id
        if self.basic_price > 0:
            new_data["basic_price"] = self.basic_price

        my_pets.write(new_data)
Hiện thực wizard view
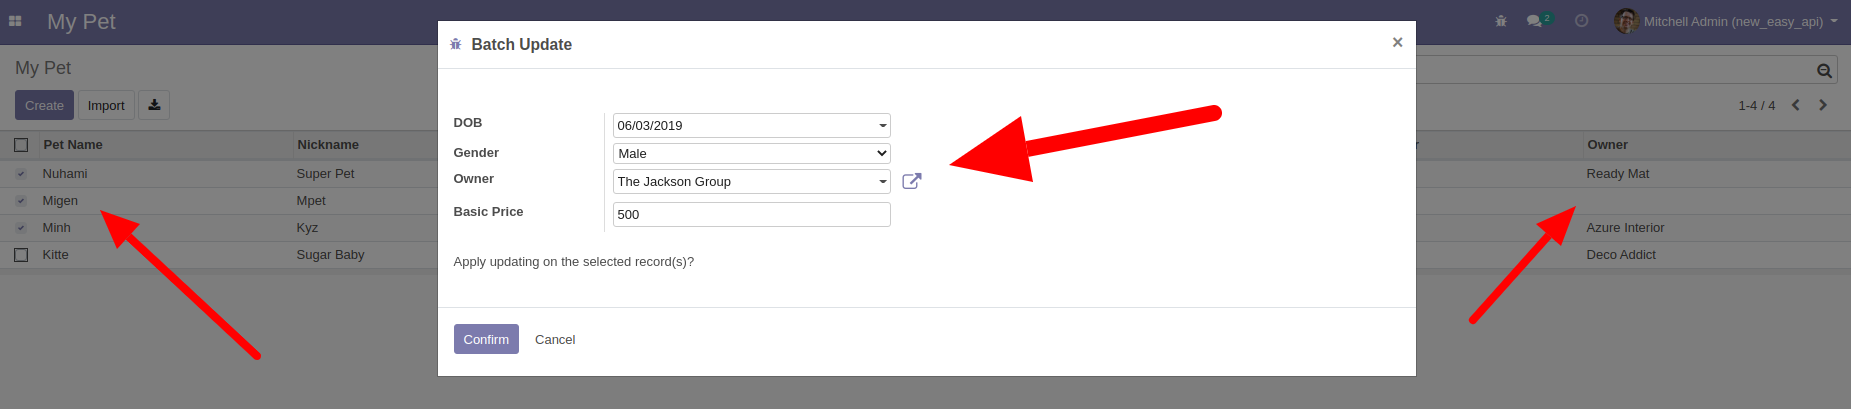
Hiện thực form pop-up lên khi click vào action Batch Update như sau:
- action_mypet_batch_update: action act window được binding vào model my.pet thông qua đặc tả
binding_model_id. - view_mypet_batch_update: hiện thực form view của wizard.
- button confirm: trỏ vào method multi_update.
- button cancel: để đóng wizard form.
mypet/wizard/batch_update.xml
<?xml version="1.0" encoding="utf-8"?>
<odoo>
    <record id="view_mypet_batch_update" model="ir.ui.view">
        <field name="name">view.mypet.batch.update</field>
        <field name="model">my.pet.batchupdate.wizard</field>
        <field name="arch" type="xml">
            <form string="Batch Update">
                <group>
                    <group>
                        <field name="dob"/>
                        <field name="gender"/>
                        <field name="owner_id"/>
                        <field name="basic_price"/>
                    </group>
                    <group/>
                </group>
                <p>
                    Apply updating on the selected record(s)?
                </p>
                <footer>
                    <button string="Confirm" name="multi_update" type="object" default_focus="1" class="btn-primary"/>
                    <button string="Cancel" class="btn-default" special="cancel"/>
                </footer>
            </form>
        </field>
    </record>

    <record id="action_mypet_batch_update" model="ir.actions.act_window">
        <field name="name">Batch Update</field>
        <field name="res_model">my.pet.batchupdate.wizard</field>
        <field name="binding_model_id" ref="model_my_pet"/>
        <field name="view_mode">form</field>
        <field name="target">new</field>
        <field name="view_id" ref="view_mypet_batch_update"/>
    </record>
</odoo>
Kết quả
Đã thêm action Batch Update của chúng mình :">
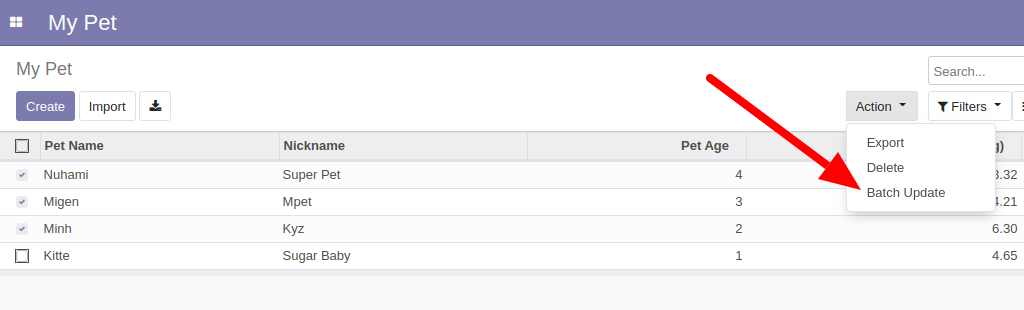
Thế à, chúng mình sử dụng Batch Update xem sao
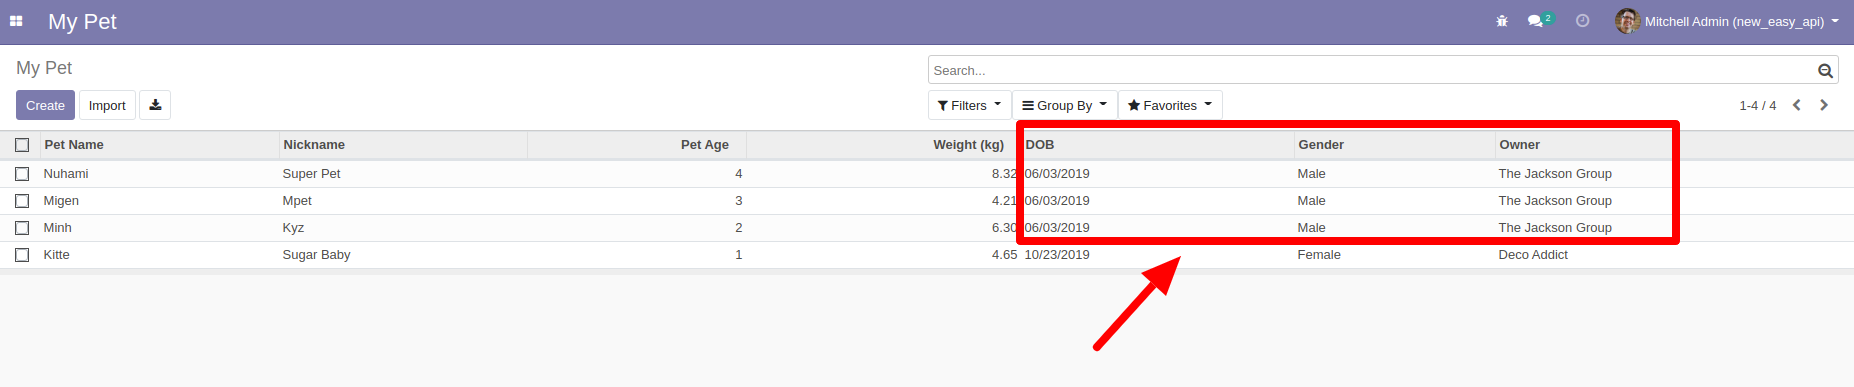
À thế à, dữ liệu đã được update đồng loạt :D
Lưu ý: nếu có vấn đề permission sử dụng action / wizard cho user thường, bạn vui lòng tự update vào file security nha @ mypet/security/ir.model.access.csv. Mình test thử trên user Admin thấy code chạy OK.
Download Odoo - Tut 10
Source code download: Tut 10: Wizard in Odoo
Bài viết tiếp theo: Tut 11: Tạo widget trong Odoo
- Khóa học lập trình Odoo TP.HCM (TẠM NGƯNG) 👉 Thông tin và đăng ký khóa học
- Khảo sát nhu cầu học nghiệp vụ Odoo Offline @ HCM & đăng ký sớm 👉 https://forms.gle/auBXLNbfuNqhJSbj8
- Khảo sát khóa học lập trình Odoo (ONLINE) 👉 https://forms.gle/WcsoWFEP1qJAfeQS8
Cài đặt Odoo:
- Docker Compose for Odoo 10
- Docker Compose for Odoo 11
- Docker Compose for Odoo 12
- Docker Compose for Odoo 13
- Docker Compose for Odoo 14
- Docker Compose for Odoo 15
- Docker Compose for Odoo 16
- Docker Compose for Odoo 17
- Docker Compose for Odoo 18
- Docker Compose for Odoo 19
Danh sách bài viết series Odoo:
- Tut 0: Học lập trình Odoo - tutorials
- Tut 1: Odoo là gì?
- Tut 2: Hướng dẫn cài đặt Odoo version 10, 11, 12, 13, 14, 15, 16, 17, 18, 19
- Tut 3: Tạo model trong Odoo
- Tut 4: View trong Odoo
- Tut 5: Controller trong Odoo
- Tut 6: Thừa kế model trong Odoo
- Tut 7: Thừa kế view trong Odoo
- Tut 8: Thừa kế controller trong Odoo
- Tut 9: API trong Odoo - XML-RPC
- Tut 10: Hiện thực wizard trong Odoo
- Tut 11: Tạo widget trong Odoo
- Tut 12: Tạo settings trong Odoo cho custom addon
- Tut 13: Thêm button cho list/tree view trong Odoo
- Tut 14: Search, Filter, Group By trong Odoo
- Tut 15: Kết nối PostgreSQL database của Odoo bằng câu lệnh
- Tut 16: Kết nối pgAdmin vào PostgreSQL database của Odoo
- Tut 17: Tra cứu mã nguồn để lập trình Odoo
- Tut 18: Thêm button cho form view trong Odoo
- Tut 19: [App] JSON REST API trong Odoo
- Tut 20: Triển khai Odoo trên VPS
- Tut 21: Nâng cấp addon lên Odoo 19 - tổng hợp thay đổi kỹ thuật
- Tut 22: [App] Dark theme trong Odoo - Dark Islands Backend Theme
Tham gia ngay group trên Facebook để cùng thảo luận với đồng bọn nhé:
- Fanpage Minh: https://www.facebook.com/minhng.info
- Khám phá Odoo: https://www.facebook.com/groups/odoo-dev
Khám phá Odoo