Thêm button cho list/tree view trong Odoo
Tut 13: Button @ tree view
Odoo Tut 13: Button @ tree view
Trước khi xem bài viết này, bạn vui lòng hoàn thành hướng dẫn ở Tut 12: Tạo settings trong Odoo cho custom addon.
Bài viết này sẽ hướng dẫn bạn:
- Cách thêm mới một button vào thanh điều khiển (control panel) phía trên giao diện danh sách trong Odoo.
- Cách hiện thực hành động thực thi cho button mới này (trigger một action ta mong muốn).
- Cách thêm button cho mỗi dòng dữ liệu (cột mới) trong giao diện danh sách và hiện thực hành động tương ứng cho nó.
Code mẫu hoàn chỉnh việc thêm button vào list view trong Odoo bạn có thể tải về ở cuối bài viết
Môi trường lập trình:
- Ubuntu
- Python 3
- Odoo 13 (released 2019)
Tham khảo bài viết sau để dựng môi trường lập trình Odoo: Tut 2: Hướng dẫn cài đặt Odoo
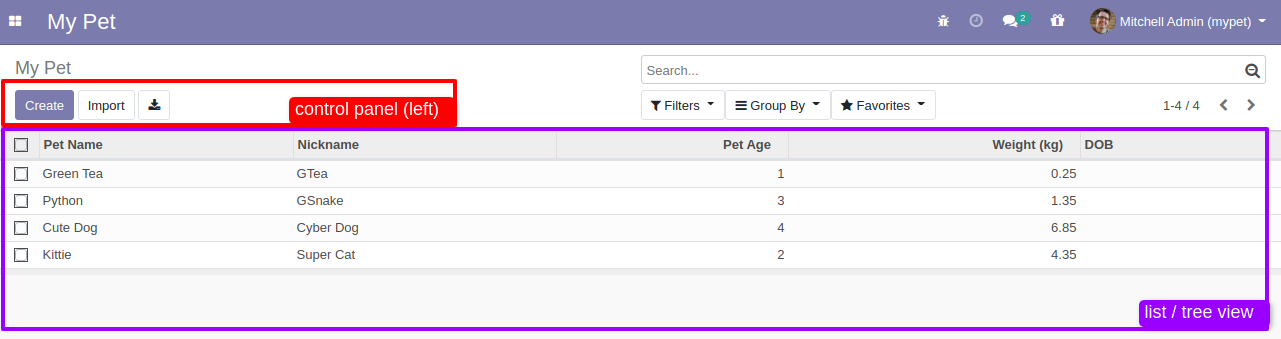
Giao diện list view (tree view) trong Odoo
- Trong Odoo, list view (giao diện danh sách dữ liệu) được gọi là tree view. Do đó, ta gọi list view hay tree view trong Odoo đều là một.
- Các Odoo developer thường gọi là tree view, vì để mô tả giao diện danh sách trong Odoo dùng thẻ <tree></tree>.
- Các nút nhấn (Create / Import / Export) nằm trong thanh điều khiển (control panel) ở khu vực bên trái, phía trên của list view.
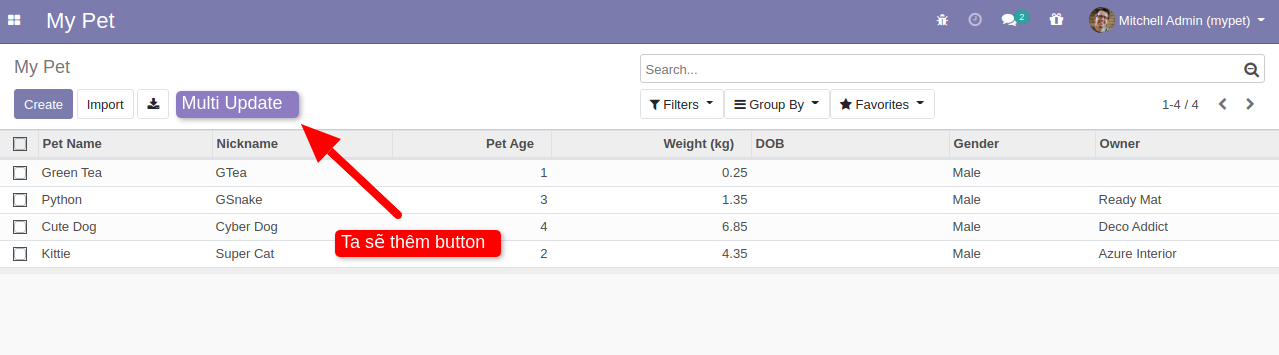
- Đôi khi, người dùng cần thêm một nút nhấn tùy chỉnh (custom button) để thực hiện logic thao tác cho toàn danh sách, thì thanh điều khiển cạnh nút Export trông khá hấp dẫn để thêm vào :)).
- Ngoài ra, nếu ta muốn thực thi nhanh một xử lý trên một dòng dữ liệu nào đó trong danh sách; thì việc thêm một cột nút nhấn cũng trông ổn đấy chứ. Cách hiện thực trong Odoo mình hướng dẫn ở mục phía dưới.
Thêm button vào thanh điều khiển phía trên list view
Mục tiêu là mình sẽ thêm một custom button vào cuối thanh điều khiển bên cạnh các nút built-in của Odoo đó là: Create, Import, Export. Button mới thêm vào mình sẽ thực thi custom logic trên giao diện danh sách record.
Thanh điều khiển chứa các nút chức năng trên list view được hiện thực ở frontend mô tả bằng Qweb: https://github.com/odoo/odoo/blob/13.0/addons/web/static/src/xml/base.xml#L265. Do đó, ta cần dùng thừa kế QWeb frontend để bổ sung thêm một button ta mong muốn.
mypet/static/src/xml/btn_tree_multi_update.xml
<?xml version="1.0" encoding="UTF-8"?>
<templates id="template" xml:space="preserve">
    <t t-extend="ListView.buttons">
        <t t-jquery="div.o_list_buttons" t-operation="append" t-if="widget.modelName=='my.pet'">
           <button type="button" class="btn btn-primary o_list_button_multi_update" accesskey="u">
                Multi Update
            </button>
        </t>
    </t>
</templates>
Lưu ý: t-if giúp button mới thêm vào Odoo chỉ render ở view của model my.pet.
Bạn nhớ khai báo template vừa hiện thực vào manifest nhé!
mypet/__manifest__.py
{
    #...
    'qweb': [
        #'static/src/xml/*.xml',
        'static/src/xml/btn_tree_multi_update.xml', # <-- khai bao thua ke qweb vua hien thuc
    ],
    #...
}
Cập nhật module mypet để thấy button vừa thêm:
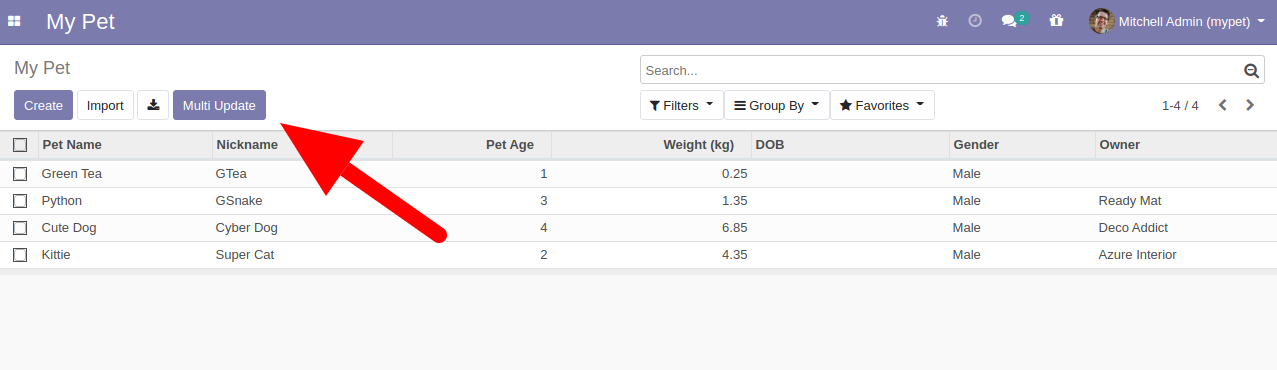
Lúc này khi nhấn vào, không có gì xảy ra vì mình chưa hiện thực hành động cho nút nhấn mới này (trigger action).
- Button mới được thêm ở Qweb frontend, do đó, việc đính sự kiện vào button này sẽ được hiện thực ở Javascript.
- Button mới "Multi Update" có class là o_list_button_multi_update (tên này mình tự định nghĩa), nó sẽ liên kết với code javascript khai báo lắng nghe sự kiện click.
- Hành động thực thi sẽ là gọi đến backend phương thức btn_multi_update trong model my.pet, tham số truyền vào args là rỗng.
- Kết quả trả về từ backend sẽ được thực thi ở frontend với phương thức built-in do_action.
- Note: hiện thực hàm renderButtons() của web.ListController mà ta sẽ thừa kế từ Odoo tại: https://github.com/odoo/odoo/blob/13.0/addons/web/static/src/js/views/list/list_controller.js#L128
mypet/static/src/js/btn_tree_multi_update.js
odoo.define('mypet.btn_tree_multi_update', function (require) {
    "use strict";
    var ListController = require('web.ListController');

    ListController.include({
        renderButtons: function ($node) {
            this._super.apply(this, arguments);
            if (!this.noLeaf && this.hasButtons) {
                this.$buttons.on('click', '.o_list_button_multi_update', this._onBtnMultiUpdate.bind(this)); // add event listener
            }
        },
        _onBtnMultiUpdate: function (ev) {
            // we prevent the event propagation because we don't want this event to
            // trigger a click on the main bus, which would be then caught by the
            // list editable renderer and would unselect the newly created row
            if (ev) {
                ev.stopPropagation();
            }
            var self = this;
            return this._rpc({
                model: 'my.pet',
                method: 'btn_multi_update',
                args: [],
                context: this.initialState.context,
            }).then(function(result) {
                // location.reload();
                self.do_action(result);
            });
        },
    });
});
Thực hiện khai báo code javascript (đương nhiên views/templates.xml đã được khai báo trong manifest):
mypet/views/templates.xml
<?xml version="1.0" encoding="utf-8"?>
<odoo>
    <template id="assets_backend" inherit_id="web.assets_backend">
        <xpath expr="." position="inside">
            <script type="text/javascript" src="/mypet/static/src/js/bold.js"></script> <!-- code cũ nè -->
            <script type="text/javascript" src="/mypet/static/src/js/btn_tree_multi_update.js"></script> <!-- khai báo hiện thực action cho button mới vừa làm @ javascript -->
        </xpath>
    </template>
</odoo>
Cập nhật module mypet và click vào button "Multi Update", bạn sẽ thấy lỗi sau:
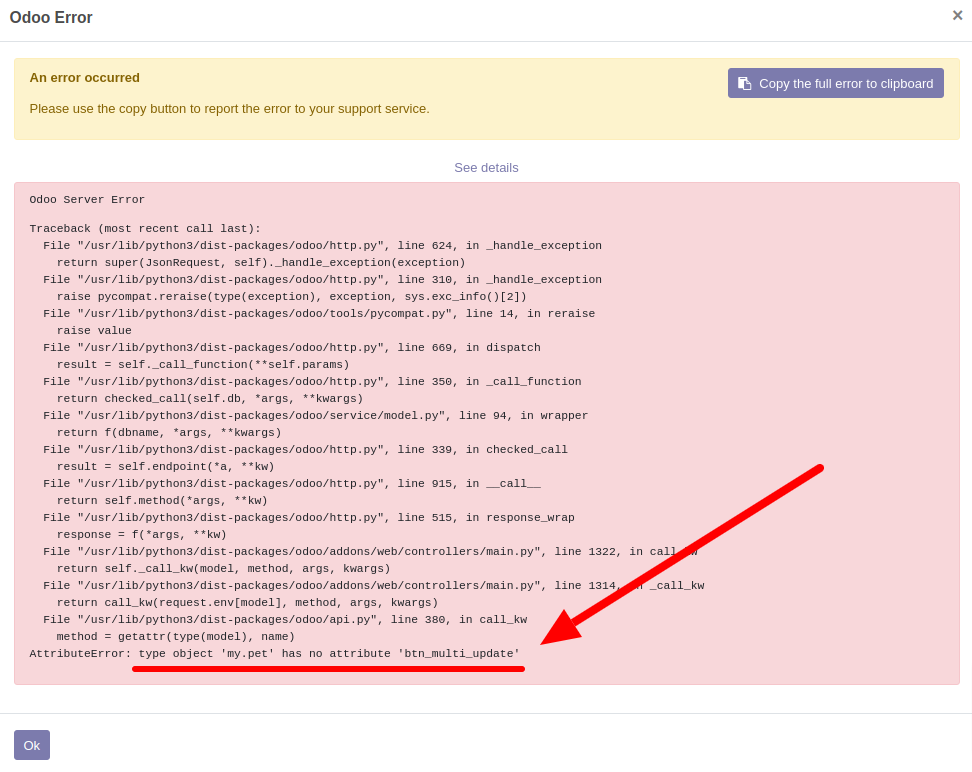
- Đây chính là lỗi do phương thức btn_multi_update chưa được hiện thực ở backend (model my.pet).
- Thực ra, ở bước này bạn có thể tự code "business logic" theo yêu cầu của khách hàng / người dùng.
- Trong phạm vi bài viết này, Minh hiện thực một action đơn giản nhằm minh họa, đó là mở Batch Update wizard đã làm ở Tut 10: Hiện thực wizard trong Odoo.
mypet/models/my_pet.py
#...
class MyPet(models.Model):
    _name = "my.pet"
    _description = "My pet model"

    #...

    # Them phuong thuc sau vao model:
    @api.model
    def btn_multi_update(self):
        # we can do something on records... it's up to you!
        # res = { 'type': 'ir.actions.client', 'tag': 'reload' } # reload the current page/url
        active_ids = [pet.id for pet in self.env["my.pet"].search([])]
        res = {
            "name": _("Multi Update"),
            "type": "ir.actions.act_window",
            "res_model": "my.pet.batchupdate.wizard",
            "binding_model_id": self.env['ir.model']._get("my.pet").id,
            "view_mode": "form",
            "target": "new",
            "views": [[False, 'form']],
            "context": {
                "active_ids": active_ids,
                "default_dob": fields.Date.context_today(self),
                "default_owner_id": self.env.user.partner_id.id,
            },
        }
        return res
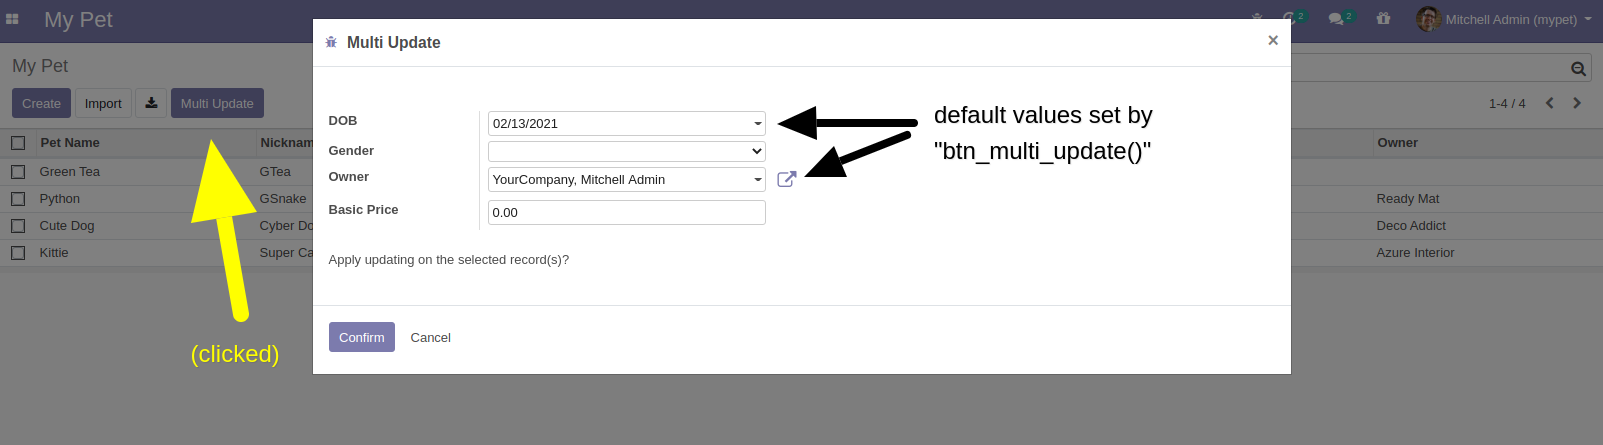
Restart lại Odoo server, lúc này khi nhấn vào button "Multi Update" trên list view sẽ hiện lên form wizard với các giá trị mặc định:
- Date of Birth (DOB): ngày hôm nay
- Owner: profile của user đang đăng nhập (model res.partner)
- Khi điền giá trị vào form => "Confirm" => reload lại trang sẽ thấy ghi vào tất cả các dòng dữ liệu có trong danh sách.
Vậy là ta đã hoàn tất việc thêm một button vào thanh điều khiển trên list view cho đến việc hiện thực "business logic" của nó.
Thêm button cho từng dòng dữ liệu của list
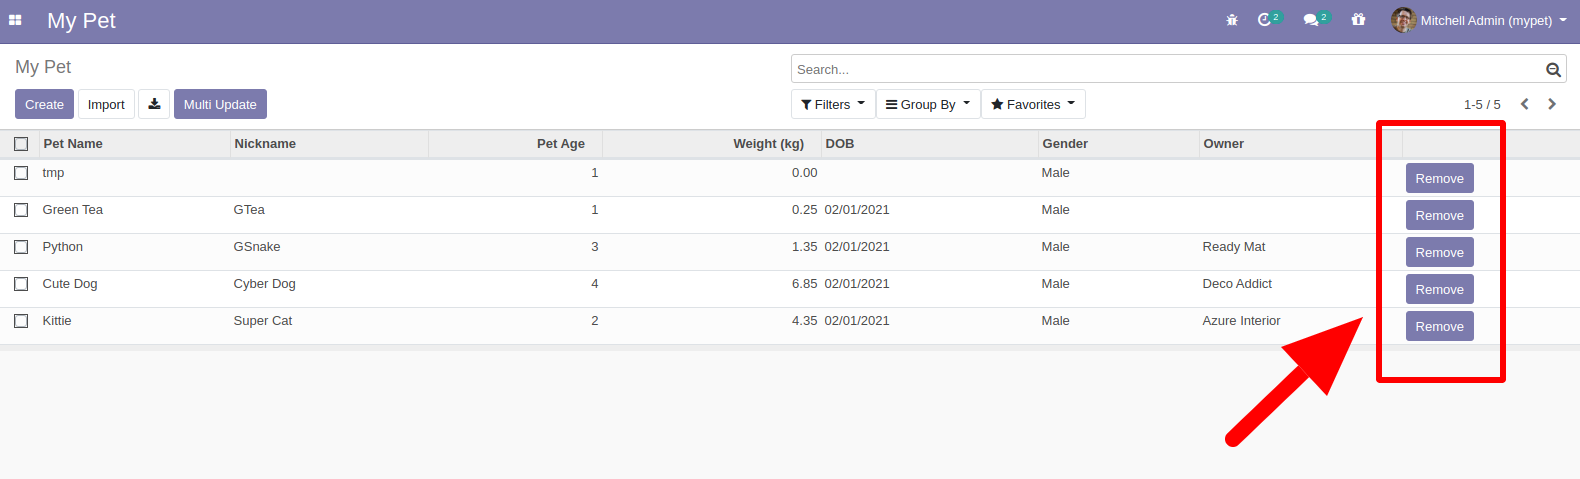
Việc hiện thực thêm button vào mỗi dòng của list view trong Odoo đơn giản hơn:
- Thêm thẻ button vào thẻ tree
- Hiện thực phương thức ở backend.
mypet/views/my_pet_views.xml
    <tree string="Pets" default_order="create_date desc">
        <field name="name"/>
        <field name="nickname"/>
        <field name="age"/>
        <field name="weight"/>
        <field name="dob"/>
        <field name="gender"/>
        <field name="owner_id"/>
        <!-- thêm dòng sau: -->
        <button name="custom_remove" type="object" string="Remove" class="oe_highlight"/>
    </tree>
mypet/models/my_pet.py
#...
class MyPet(models.Model):
    _name = "my.pet"
    _description = "My pet model"

    #...

    # thêm hàm sau đây hiện thực logic mong muốn, button ở tree sẽ gọi tới:
    def custom_remove(self):
        for pet in self:
            pet.unlink()
        #_logger.warning(self.id) # 5
        #_logger.warning(self.ids) # [5]
        pass
Update module mypet và restart lại server. Nhấn vào button "Remove" để xóa record tương ứng trong list view trong Odoo.
Code Download
Code mẫu hoàn chỉnh Tut 13: mypet_210213.zip
- Khóa học lập trình Odoo TP.HCM (TẠM NGƯNG) 👉 Thông tin và đăng ký khóa học
- Khảo sát nhu cầu học nghiệp vụ Odoo Offline @ HCM & đăng ký sớm 👉 https://forms.gle/auBXLNbfuNqhJSbj8
- Khảo sát khóa học lập trình Odoo (ONLINE) 👉 https://forms.gle/WcsoWFEP1qJAfeQS8
Cài đặt Odoo:
- Docker Compose for Odoo 10
- Docker Compose for Odoo 11
- Docker Compose for Odoo 12
- Docker Compose for Odoo 13
- Docker Compose for Odoo 14
- Docker Compose for Odoo 15
- Docker Compose for Odoo 16
- Docker Compose for Odoo 17
- Docker Compose for Odoo 18
- Docker Compose for Odoo 19
Danh sách bài viết series Odoo:
- Tut 0: Học lập trình Odoo - tutorials
- Tut 1: Odoo là gì?
- Tut 2: Hướng dẫn cài đặt Odoo version 10, 11, 12, 13, 14, 15, 16, 17, 18, 19
- Tut 3: Tạo model trong Odoo
- Tut 4: View trong Odoo
- Tut 5: Controller trong Odoo
- Tut 6: Thừa kế model trong Odoo
- Tut 7: Thừa kế view trong Odoo
- Tut 8: Thừa kế controller trong Odoo
- Tut 9: API trong Odoo - XML-RPC
- Tut 10: Hiện thực wizard trong Odoo
- Tut 11: Tạo widget trong Odoo
- Tut 12: Tạo settings trong Odoo cho custom addon
- Tut 13: Thêm button cho list/tree view trong Odoo
- Tut 14: Search, Filter, Group By trong Odoo
- Tut 15: Kết nối PostgreSQL database của Odoo bằng câu lệnh
- Tut 16: Kết nối pgAdmin vào PostgreSQL database của Odoo
- Tut 17: Tra cứu mã nguồn để lập trình Odoo
- Tut 18: Thêm button cho form view trong Odoo
- Tut 19: [App] JSON REST API trong Odoo
- Tut 20: Triển khai Odoo trên VPS
- Tut 21: Nâng cấp addon lên Odoo 19 - tổng hợp thay đổi kỹ thuật
- Tut 22: [App] Dark theme trong Odoo - Dark Islands Backend Theme
Tham gia ngay group trên Facebook để cùng thảo luận với đồng bọn nhé:
- Fanpage Minh: https://www.facebook.com/minhng.info
- Khám phá Odoo: https://www.facebook.com/groups/odoo-dev
Khám phá Odoo