OpenCV: vẽ văn bản, đường thẳng, mũi tên, hình chữ nhật, hình tròn, ellipse, đa giác
OpenCV - Tut 4.1: Vẽ văn bản, hình học lên ảnh
Vẽ trong OpenCV
Trực quan hóa kết quả xử lý ảnh cũng quan trọng như cách ăn diện của bạn hàng ngày vậy. Vẽ vời đẹp, chuyên nghiệp sẽ gây ấn tượng cho người xem. Nay Minh sẽ viết một số hàm vẽ cơ bản lên ảnh dùng thư viện OpenCV. Mình sẽ cố gắng code tổng quát nhất có thể để bạn có thể copy code và sử dụng ngay vào dự án của mình mà ít phải chỉnh sửa tham số. Cụ thể mình sẽ gói (wrap) các hàm vẽ lại để nó vẽ đường nét đậm nhạt tương đối theo kích thước ảnh. Điều này cực kỳ tốt khi bạn đang làm dự án Xử Lý Ảnh, Học Máy (machine learning) để xử lý nhiều ảnh với kích thước / độ phân giải đa dạng; và ta sẽ phải visualize kết quả lên trên các ảnh này. OK, let's go, chiến thôi!
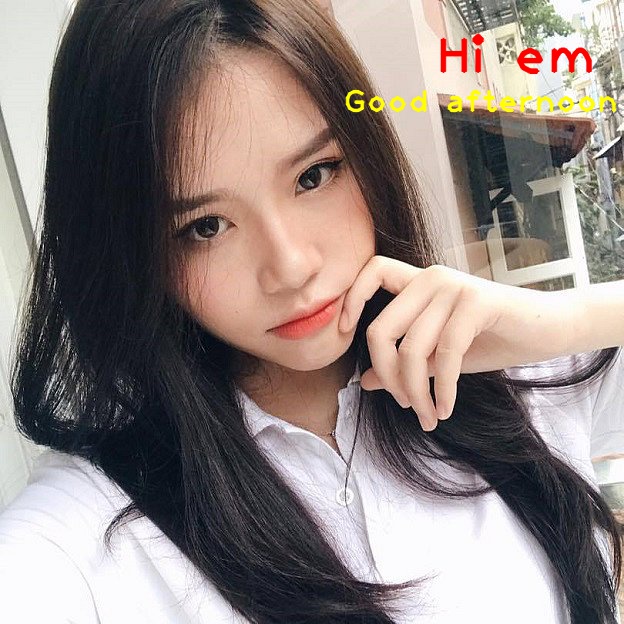
Việc đầu tiên và trên hết "xẩy" đó là lấy một ảnh mẫu làm "tài liệu tham khảo" nào. Tui đã chuẩn bị sẵn cho các ông :">. Mình thích thì mình "tha thu" lên ảnh thôi :v.
girl.jpg

Ghi chữ lên ảnh
Trong OpenCV để ghi chữ lên ảnh, bạn sẽ dùng hàm cv2.putText. Hàm này sẽ ghi chữ trực tiếp lên ảnh, do đó nó sẽ chỉnh sửa trực tiếp trên ảnh gốc. Nếu muốn giữ ma trận ảnh gốc chưa vẽ, ta cần phải sao chép (copy / clone) ra. Một số tham số cho hàm putText:
- text: nội dung chữ.
- org: tọa độ đặt chữ lên ảnh, nó sẽ ứng với góc dưới bên trái của "text" (bottom-left).
- fontFace: font chữ, tham khảo thêm @ https://docs.opencv.org/4.3.0/d6/d6e/group__imgproc__draw.html#ga0f9314ea6e35f99bb23f29567fc16e11. Có vẻ hiện tại OpenCV chỉ hỗ trợ font chữ Hershey nên còn nhiều hạn chế cho lựa chọn font chữ.
- fontScale: kích thước chữ, scale to bao nhiêu lần so với kích thước font chữ chuẩn.
- color: màu sắc chữ theo hệ màu BGR. Tham khảo hệ màu @ Tut 1.1: Xử lý ảnh - Cấu trúc dữ liệu ảnh trong OpenCV. Pixel là gì?.
- thickness: độ dày (đậm) của chữ. Trong word ta hay gọi là bold.
- lineType: độ "smooth" của nét.
- bottomLeftOrigin: dùng hệ trục ở góc trái hay không? Set False tức dùng gốc tọa độ ở góc phía trên bên trái ảnh, đây là gốc tọa độ chuẩn trong Xử Lý Ảnh.
Minh đã cá nhân hóa này thành một hàm draw_text() cho phép đặc tả size ảnh tương đối theo kích thước ảnh, nó sẽ ước lượng tính toán tự động fontScale phù hợp để chữ to bằng size % so với cạnh ngắn của ảnh. Điểm lợi của cách làm này đó là với ảnh độ phân giải cao chữ cũng sẽ "to" ra tương ứng, hoặc "nhỏ" lại một cách tương dối theo kích thước / độ phân giải ảnh. Tránh việc "tuning" giá trị fontScale, thickness khi xử lý nhiều loại ảnh khác nhau.
Set thickness bằng zero (0) vào hàm draw_text() của mình để nó tự tính độ đậm thickness phù hợp với kích thước chữ. Tọa độ chữ mình sẽ nhận vô giá trị 0-1 tương đối so với kích thước ảnh.
Cách sử dụng được minh họa trong đoạn code bên dưới:
- Mình ghi chữ "Hi em" @ (0.70, 0.12) màu đỏ, size chữ 5%; is_copy=True bằng True để clone ảnh kết quả, không vẽ trực tiếp lên ảnh gốc.
- Mình tiếp tục ghi chữ "Good afternoon" lên ảnh vừa vẽ ở bước trên @ (0.55, 0.18) màu vàng, size chữ 3% (nhỏ hơn chữ trên); lưu ý is_copy=False để ghi chữ tiếp lên ma trận ảnh vừa rồi.
draw_text.py
import cv2

IMAGE = "girl.jpg"
OUT_IMAGE = "girl_text.jpg"

def draw_text(image,
              text,
              x,
              y,
              color_bgr=[255, 0, 0],
              size=0.05, # in the range of (0, 1.0)
              font_face=cv2.FONT_HERSHEY_PLAIN,
              thickness=0, # 0: auto
              line_type=cv2.LINE_AA,
              is_copy=True):
    """
        Supported Fonts: https://docs.opencv.org/4.3.0/d6/d6e/group__imgproc__draw.html#ga0f9314ea6e35f99bb23f29567fc16e11
        Line Types: https://docs.opencv.org/4.3.0/d6/d6e/group__imgproc__draw.html#gaf076ef45de481ac96e0ab3dc2c29a777
    """
    assert size > 0

    image = image.copy() if is_copy else image # copy/clone a new image
    if not text: # empty text
        return image

    # https://docs.opencv.org/4.3.0/d6/d6e/group__imgproc__draw.html#ga3d2abfcb995fd2db908c8288199dba82
    (text_width, text_height), _ = cv2.getTextSize(text, font_face, 1.0, thickness) # estimate text size

    # calculate font scale
    h, w = image.shape[:2]
    short_edge = min(h, w)
    expect_size = short_edge * size
    font_scale = expect_size / text_height

    # calc thickness
    if thickness <= 0:
        thickness = int(font_scale)
        thickness = 1 if thickness == 0 else thickness

    # calc x,y in absolute coord
    x_abs = int(x * w)
    y_abs = int(y * h)

    # docs: https://docs.opencv.org/4.3.0/d6/d6e/group__imgproc__draw.html#ga5126f47f883d730f633d74f07456c576
    cv2.putText(img=image,
                text=text,
                org=(x_abs, y_abs),
                fontFace=font_face,
                fontScale=font_scale,
                color=color_bgr,
                thickness=thickness,
                lineType=line_type,
                bottomLeftOrigin=False)
    return image

def main():
    img = cv2.imread(IMAGE)
    img_text = draw_text(image=img,
                         text="Hi em",
                         x=0.70,
                         y=0.12,
                         size=0.05,
                         color_bgr=[0, 0, 255],
                         is_copy=True)
    img_text = draw_text(image=img_text,
                         text="Good afternoon",
                         x=0.55,
                         y=0.18,
                         size=0.03,
                         color_bgr=[0, 255, 255],
                         is_copy=False)
    cv2.imwrite(OUT_IMAGE, img_text)
    print("Done drawing text @ %s" % OUT_IMAGE)

if __name__ == "__main__":
    main()
    print('* Follow me @ ' + "\x1b[1;%dm" % (34) + ' https://www.facebook.com/kyznano/' + "\x1b[0m")
    print('* Minh fanpage @ ' + "\x1b[1;%dm" % (34) + ' https://www.facebook.com/minhng.info/' + "\x1b[0m")
    print('* Join GVGroup @ ' + "\x1b[1;%dm" % (34) + 'https://www.facebook.com/groups/ip.gvgroup/' + "\x1b[0m")
    print('* Thank you ^^~')
Kết quả "tha thu" chữ của chúng ta:
girl_text.jpg: chữ "Hi em" size 5%, chữ "Good afternoon" size 3%. Ae muốn chữ to / nhỏ thì điều chỉnh size tương ứng nhé :).
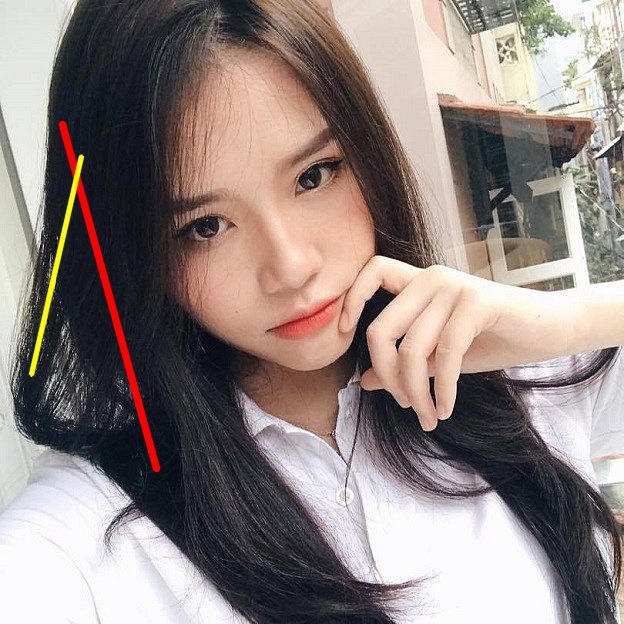
Vẽ đường thẳng
Ông nào vẽ đường thẳng dùng thư viện của OpenCV thì tham khảo hàm cv2.line(). Minh đã wrap hàm đó lại thành draw_line() như hiện thực bên dưới. Các tọa độ x, y đơn vị theo % (giá trị từ 0-1), điều chỉnh độ dày của đường thẳng theo tham số size; Minh đang để size mặc định 1% thấy cũng tạm ổn ^^.
Size 1% nghĩa là mình sẽ tính thickness bằng 1% chiều ngắn của ảnh. Giả sử ảnh độ phân giải là 640x480 => cạnh ngắn sẽ là 480px => 1% của 480px sẽ là 4.8px => thickness = int(4.8) = 4.
draw_line.py
import cv2

IMAGE = "girl.jpg"
OUT_IMAGE = "girl_line.jpg"

def draw_line(image,
              x_from,
              y_from,
              x_to,
              y_to,
              color_bgr=[255, 0, 0],
              size=0.01, # 1%
              line_type=cv2.LINE_AA,
              is_copy=True):
    assert size > 0

    image = image.copy() if is_copy else image # copy/clone a new image

    # calculate thickness
    h, w = image.shape[:2]
    short_edge = min(h, w)
    thickness = int(short_edge * size)
    thickness = 1 if thickness <= 0 else thickness

    # calc x,y in absolute coord
    x_from_abs = int(x_from * w)
    y_from_abs = int(y_from * h)
    x_to_abs = int(x_to * w)
    y_to_abs = int(y_to * h)

    # docs: https://docs.opencv.org/master/d6/d6e/group__imgproc__draw.html#ga7078a9fae8c7e7d13d24dac2520ae4a2
    cv2.line(img=image,
            pt1=(x_from_abs, y_from_abs),
            pt2=(x_to_abs, y_to_abs),
            color=color_bgr,
            thickness=thickness,
            lineType=line_type,
            shift=0)
    return image

def main():
    img = cv2.imread(IMAGE)
    img_line = draw_line(image=img,
                         x_from=0.10,
                         y_from=0.20,
                         x_to=0.25,
                         y_to=0.75,
                         color_bgr=[0, 0, 255],
                         is_copy=True)
    img_line = draw_line(image=img_line,
                         x_from=0.13,
                         y_from=0.25,
                         x_to=0.05,
                         y_to=0.60,
                         size=0.005,
                         color_bgr=[0, 255, 255],
                         is_copy=False)
    cv2.imwrite(OUT_IMAGE, img_line)
    print("Done drawing line @ %s" % OUT_IMAGE)

if __name__ == "__main__":
    main()
    print('* Follow me @ ' + "\x1b[1;%dm" % (34) + ' https://www.facebook.com/kyznano/' + "\x1b[0m")
    print('* Minh fanpage @ ' + "\x1b[1;%dm" % (34) + ' https://www.facebook.com/minhng.info/' + "\x1b[0m")
    print('* Join GVGroup @ ' + "\x1b[1;%dm" % (34) + 'https://www.facebook.com/groups/ip.gvgroup/' + "\x1b[0m")
    print('* Thank you ^^~')
Kết quả "tha thu" đoạn thẳng:
girl_line.jpg: line vàng size 0.5%, line đỏ size 1%.
Vẽ mũi tên
Tài liệu hàm cv2.arrowedLine(), các ông tự xem nha. Lười giải thích wé :D.
Bên dưới là code mình wrap lại draw_arrow() cách dùng tương tự draw_line(). Tip Length nghĩa là phần mũi tên chiếm bao nhiêu % so với chiều dài line. Các giá trị mặc định trong hàm draw_arrow() mình thấy cũng đẹp ùi. Các ông cứ tùy chỉnh nhé :D.
draw_arrow.py
import cv2

IMAGE = "girl.jpg"
OUT_IMAGE = "girl_arrow.jpg"

def draw_arrow(image,
              x_from,
              y_from,
              x_to,
              y_to,
              color_bgr=[255, 0, 0],
              size=0.01, # 1%
              tip_length=0.1,
              line_type=cv2.LINE_AA,
              is_copy=True):
    assert size > 0

    image = image.copy() if is_copy else image # copy/clone a new image

    # calculate thickness
    h, w = image.shape[:2]
    short_edge = min(h, w)
    thickness = int(short_edge * size)
    thickness = 1 if thickness <= 0 else thickness

    # calc x,y in absolute coord
    x_from_abs = int(x_from * w)
    y_from_abs = int(y_from * h)
    x_to_abs = int(x_to * w)
    y_to_abs = int(y_to * h)

    # docs: https://docs.opencv.org/master/d6/d6e/group__imgproc__draw.html#ga7078a9fae8c7e7d13d24dac2520ae4a2
    cv2.arrowedLine(img=image,
            pt1=(x_from_abs, y_from_abs),
            pt2=(x_to_abs, y_to_abs),
            color=color_bgr,
            thickness=thickness,
            line_type=line_type,
            shift=0,
            tipLength=tip_length)
    return image

def main():
    img = cv2.imread(IMAGE)
    img_arrow = draw_arrow(image=img,
                         x_from=0.10,
                         y_from=0.20,
                         x_to=0.25,
                         y_to=0.75,
                         color_bgr=[0, 0, 255],
                         is_copy=True)
    img_arrow = draw_arrow(image=img_arrow,
                         x_from=0.13,
                         y_from=0.25,
                         x_to=0.05,
                         y_to=0.60,
                         size=0.005,
                         color_bgr=[0, 255, 255],
                         is_copy=False)
    cv2.imwrite(OUT_IMAGE, img_arrow)
    print("Done drawing arrow @ %s" % OUT_IMAGE)

if __name__ == "__main__":
    main()
    print('* Follow me @ ' + "\x1b[1;%dm" % (34) + ' https://www.facebook.com/kyznano/' + "\x1b[0m")
    print('* Minh fanpage @ ' + "\x1b[1;%dm" % (34) + ' https://www.facebook.com/minhng.info/' + "\x1b[0m")
    print('* Join GVGroup @ ' + "\x1b[1;%dm" % (34) + 'https://www.facebook.com/groups/ip.gvgroup/' + "\x1b[0m")
    print('* Thank you ^^~')
![]()
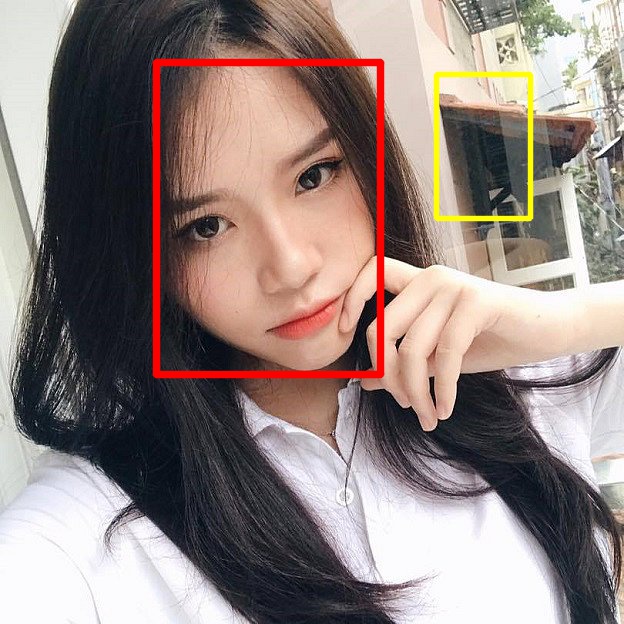
Vẽ hình chữ nhật
Vẽ hình chữ nhật trong OpenCV ta dùng hàm cv2.rectangle(). Mình cũng đã customize lại thành hàm draw_rect(), điều chỉnh độ đậm nhạt của hình chữ nhật bằng tham số size. Nếu size set giá trị <= 0, hàm của mình vẽ hình chữ nhật đặc ruột nha.
Vẽ hình chữ nhật (hay còn gọi là vẽ box) thường được dùng để trực quan hóa kết quả phát hiện đối tượng trong bài toán object detection. Các đối tượng thường được phát hiện và khoanh vùng theo hình chữ nhật.
draw_rect.py
import cv2

IMAGE = "girl.jpg"
OUT_IMAGE = "girl_rect.jpg"

def draw_rect(image,
              x_from,
              y_from,
              x_to,
              y_to,
              color_bgr=[255, 0, 0],
              size=0.01, # 1%
              line_type=cv2.LINE_AA,
              is_copy=True):
    assert size > 0

    image = image.copy() if is_copy else image # copy/clone a new image

    # calculate thickness
    h, w = image.shape[:2]
    if size > 0:
        short_edge = min(h, w)
        thickness = int(short_edge * size)
        thickness = 1 if thickness <= 0 else thickness
    else:
        thickness = -1

    # calc x,y in absolute coord
    x_from_abs = int(x_from * w)
    y_from_abs = int(y_from * h)
    x_to_abs = int(x_to * w)
    y_to_abs = int(y_to * h)

    # docs: https://docs.opencv.org/master/d6/d6e/group__imgproc__draw.html#ga07d2f74cadcf8e305e810ce8eed13bc9
    cv2.rectangle(img=image,
            pt1=(x_from_abs, y_from_abs),
            pt2=(x_to_abs, y_to_abs),
            color=color_bgr,
            thickness=thickness,
            lineType=line_type,
            shift=0)
    return image

def main():
    img = cv2.imread(IMAGE)
    img_rect = draw_rect(image=img,
                         x_from=0.25,
                         y_from=0.10,
                         x_to=0.61,
                         y_to=0.60,
                         color_bgr=[0, 0, 255],
                         is_copy=True)
    img_rect = draw_rect(image=img_rect,
                         x_from=0.70,
                         y_from=0.12,
                         x_to=0.85,
                         y_to=0.35,
                         size=0.005,
                         color_bgr=[0, 255, 255],
                         is_copy=False)
    cv2.imwrite(OUT_IMAGE, img_rect)
    print("Done drawing rect @ %s" % OUT_IMAGE)

if __name__ == "__main__":
    main()
    print('* Follow me @ ' + "\x1b[1;%dm" % (34) + ' https://www.facebook.com/kyznano/' + "\x1b[0m")
    print('* Minh fanpage @ ' + "\x1b[1;%dm" % (34) + ' https://www.facebook.com/minhng.info/' + "\x1b[0m")
    print('* Join GVGroup @ ' + "\x1b[1;%dm" % (34) + 'https://www.facebook.com/groups/ip.gvgroup/' + "\x1b[0m")
    print('* Thank you ^^~')
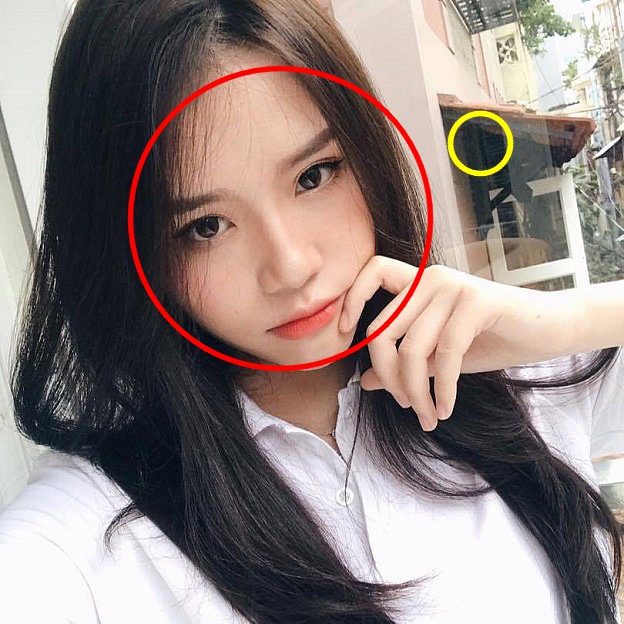
Vẽ hình tròn
Vẽ hình tròn trong OpenCV ta dùng hàm cv2.circle().
Đặc tả hàm draw_circle():
- center_x: tọa độ x tâm hình tròn theo %
- center_y: tọa độ y tâm hình tròn theo %
- radius_px: bán hình hình tròn theo đơn vị px
- size: độ đậm nét theo %
draw_circle.py
import cv2

IMAGE = "girl.jpg"
OUT_IMAGE = "girl_circle.jpg"

def draw_circle(image,
              center_x,
              center_y,
              radius_px,
              size=0.01, # -1: filled
              color_bgr=[255, 0, 0],
              line_type=cv2.LINE_AA,
              is_copy=True):

    image = image.copy() if is_copy else image # copy/clone a new image

    # calculate thickness
    h, w = image.shape[:2]
    if size > 0:
        short_edge = min(h, w)
        thickness = int(short_edge * size)
        thickness = 1 if thickness <= 0 else thickness
    else:
        thickness = -1

    # calc x,y in absolute coord
    x_abs = int(center_x * w)
    y_abs = int(center_y * h)

    # docs: https://docs.opencv.org/master/d6/d6e/group__imgproc__draw.html#gaf10604b069374903dbd0f0488cb43670
    cv2.circle(img=image,
            center=(x_abs, y_abs),
            radius=radius_px,
            color=color_bgr,
            thickness=thickness,
            lineType=line_type,
            shift=0)
    return image

def main():
    img = cv2.imread(IMAGE)
    img_circle = draw_circle(image=img,
                             center_x=0.45,
                             center_y=0.35,
                             radius_px=150,
                             color_bgr=[0, 0, 255],
                             size=0.005,
                             is_copy=True)
    img_circle = draw_circle(image=img_circle,
                             center_x=0.77,
                             center_y=0.23,
                             radius_px=30,
                             size=0.007,
                             color_bgr=[0, 255, 255],
                             is_copy=False)
    cv2.imwrite(OUT_IMAGE, img_circle)
    print("Done drawing circle @ %s" % OUT_IMAGE)

if __name__ == "__main__":
    main()
    print('* Follow me @ ' + "\x1b[1;%dm" % (34) + ' https://www.facebook.com/kyznano/' + "\x1b[0m")
    print('* Minh fanpage @ ' + "\x1b[1;%dm" % (34) + ' https://www.facebook.com/minhng.info/' + "\x1b[0m")
    print('* Join GVGroup @ ' + "\x1b[1;%dm" % (34) + 'https://www.facebook.com/groups/ip.gvgroup/' + "\x1b[0m")
    print('* Thank you ^^~')
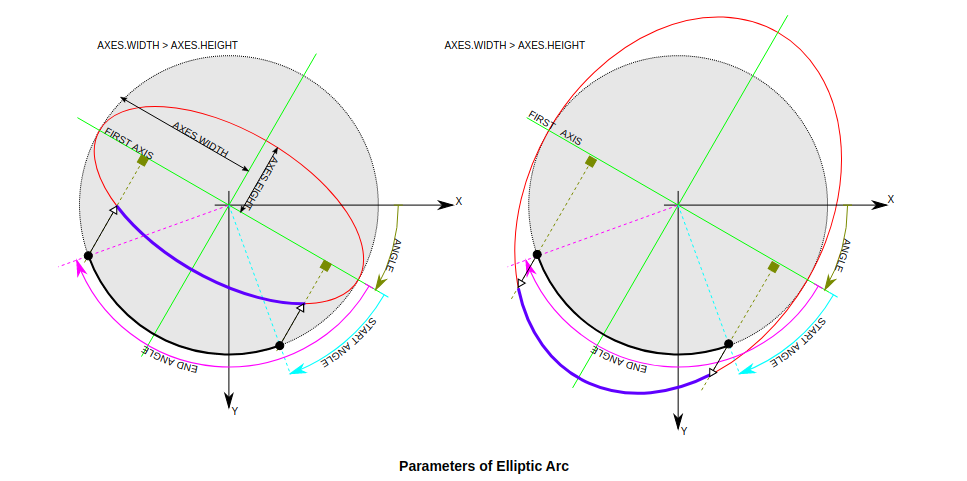
Vẽ ellipse
Vẽ ellipse trong OpenCV ta dùng hàm cv2.ellipse().
Đặc tả hàm draw_ellipse(), hàm này Minh chỉ điều chỉnh nhẹ chỗ tọa độ center lấy theo % và nét đậm của đường ellipse theo tham số size:
- center_x, center_y: tọa độ (x, y) theo %. Miền giá trị [0, 1]
- angle: góc của ellipse so với trục X. Chiều tính theo chiều kim đồng hồ
- width_px: độ rộng của ellipse trải dài theo hướng angle
- height_px: độ cao của ellipse theo phương vuông góc
- start_angle, end_angle: đặc tả cung ellipse sẽ vẽ. start_angle là góc tính từ angle trở đi. start_angle=0, end_angle=360 tức ta sẽ vẽ toàn đường ellipse
- size: đơn vị theo % cạnh ngắn của ảnh để tính tự động thickness. size <= 0 để vẽ ellipse đặc.
- color: màu sắc của ellipse
- is_copy: clone ảnh gốc ra để vẽ (True) hoặc vẽ trực tiếp lên ảnh gốc (False)
draw_ellipse.py
import cv2

IMAGE = "girl.jpg"
OUT_IMAGE = "girl_ellipse.jpg"

def draw_ellipse(image,
              center_x,
              center_y,
              width_px,
              height_px,
              angle=0,
              start_angle=0,
              end_angle=360,
              color_bgr=[255, 0, 0],
              size=0.01, # -1: filled
              line_type=cv2.LINE_AA,
              is_copy=True):

    image = image.copy() if is_copy else image # copy/clone a new image

    # calculate thickness
    h, w = image.shape[:2]
    if size > 0:
        short_edge = min(h, w)
        thickness = int(short_edge * size)
        thickness = 1 if thickness <= 0 else thickness
    else:
        thickness = -1

    # calc x,y in absolute coord
    x_abs = int(center_x * w)
    y_abs = int(center_y * h)

    # docs: https://docs.opencv.org/master/d6/d6e/group__imgproc__draw.html#ga28b2267d35786f5f890ca167236cbc69
    cv2.ellipse(img=image,
                center=(x_abs, y_abs),
                axes=(width_px, height_px),
                angle=angle,
                startAngle=start_angle,
                endAngle=end_angle,
                color=color_bgr,
                thickness=thickness,
                lineType=line_type,
                shift=0)
    return image

def main():
    img = cv2.imread(IMAGE)
    img_ellipse = draw_ellipse(image=img,
                              center_x=0.45,
                              center_y=0.35,
                              angle=-20,
                              width_px=120,
                              height_px=160,
                              start_angle=0,
                              end_angle=360,
                              color_bgr=[0, 0, 255],
                              size=0.01, # -1: filled
                              line_type=cv2.LINE_AA,
                              is_copy=True)
    img_ellipse = draw_ellipse(image=img_ellipse,
                              center_x=0.77,
                              center_y=0.23,
                              width_px=30,
                              height_px=60,
                              angle=0,
                              start_angle=0,
                              end_angle=120,
                              color_bgr=[0, 255, 255],
                              size=0.01, # -1: filled
                              line_type=cv2.LINE_AA,
                              is_copy=False)
    cv2.imwrite(OUT_IMAGE, img_ellipse)
    print("Done drawing ellipse @ %s" % OUT_IMAGE)

if __name__ == "__main__":
    main()
    print('* Follow me @ ' + "\x1b[1;%dm" % (34) + ' https://www.facebook.com/kyznano/' + "\x1b[0m")
    print('* Minh fanpage @ ' + "\x1b[1;%dm" % (34) + ' https://www.facebook.com/minhng.info/' + "\x1b[0m")
    print('* Join GVGroup @ ' + "\x1b[1;%dm" % (34) + 'https://www.facebook.com/groups/ip.gvgroup/' + "\x1b[0m")
    print('* Thank you ^^~')

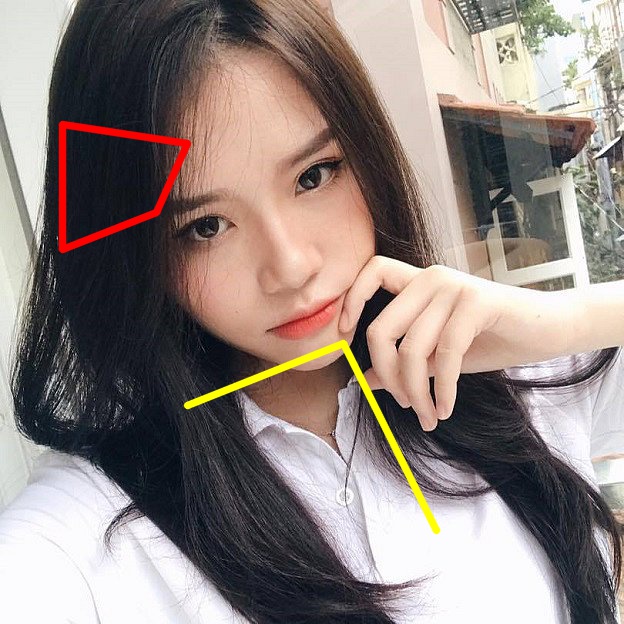
Vẽ đa giác
Vẽ đường đa giác trong OpenCV ta dùng hàm cv2.polylines().
Minh đã gói gém hàm polylines lại thành hàm draw_poly() của mình. Một số lưu ý sử dụng:
- pts: danh sách điểm trong ảnh để vẽ đa giác, tọa độ theo %. Định dạng: [(x1, y1), (x2, y2), …]
- is_closed: đa giác đóng (True) sẽ nối điểm cuối vào điểm đầu, đa giác hở (False) sẽ không nối 2 điểm đầu / cuối
- size: độ đậm của nét / đường theo %. Giá trị mặc định 1%.
draw_poly.py
import cv2
import numpy as np

IMAGE = "girl.jpg"
OUT_IMAGE = "girl_poly.jpg"

def draw_poly(image,
              pts,
              is_closed=True,
              color_bgr=[255, 0, 0],
              size=0.01, # 1%
              line_type=cv2.LINE_AA,
              is_copy=True):
    assert size > 0

    image = image.copy() if is_copy else image # copy/clone a new image

    # calculate thickness
    h, w = image.shape[:2]
    if size > 0:
        short_edge = min(h, w)
        thickness = int(short_edge * size)
        thickness = 1 if thickness <= 0 else thickness
    else:
        thickness = -1

    # calc x,y in absolute coord
    new_pts = []
    for x, y in pts:
        new_pts.append(
            (int(x*w), int(y*h))
        )

    print("new_pts", new_pts)

    # docs: https://docs.opencv.org/master/d6/d6e/group__imgproc__draw.html#gaa3c25f9fb764b6bef791bf034f6e26f5
    cv2.polylines(img=image,
                  pts=[np.int32(new_pts)],
                  isClosed=is_closed,
                  color=color_bgr,
                  thickness=thickness,
                  lineType=line_type,
                  shift=0)
    return image

def main():
    img = cv2.imread(IMAGE)
    img_poly = draw_poly(image=img,
                          pts=[(0.1, 0.2), (0.3, 0.23), (0.25, 0.34), (0.1, 0.4)],
                          is_closed=True,
                          color_bgr=[0, 0, 255],
                          size=0.01, # 1%
                          is_copy=True)
    img_poly = draw_poly(image=img_poly,
                          pts=[(0.3, 0.65), (0.55, 0.55), (0.70, 0.85)],
                          is_closed=False,
                          color_bgr=[0, 255, 255],
                          size=0.01, # 1%
                          is_copy=False)
    cv2.imwrite(OUT_IMAGE, img_poly)
    print("Done drawing poly @ %s" % OUT_IMAGE)

if __name__ == "__main__":
    main()
    print('* Follow me @ ' + "\x1b[1;%dm" % (34) + ' https://www.facebook.com/kyznano/' + "\x1b[0m")
    print('* Minh fanpage @ ' + "\x1b[1;%dm" % (34) + ' https://www.facebook.com/minhng.info/' + "\x1b[0m")
    print('* Join GVGroup @ ' + "\x1b[1;%dm" % (34) + 'https://www.facebook.com/groups/ip.gvgroup/' + "\x1b[0m")
    print('* Thank you ^^~')
Vậy là cũng đã kết thúc bài viết vẽ vời trong OpenCV lên ảnh rồi. Trực quan hóa thường nằm ở bước hậu xử lý để "visualize" kết quả dự đoán của giải thuật / mô hình của chúng ta.
Bài viết tiếp theo: Tut 4.2: Xử lý ảnh - Pha trộn ảnh trong OpenCV (blending)
Cảm ơn bạn đã theo dõi bài viết. Hãy kết nối với tớ nhé!
- Minh: https://www.facebook.com/minhng.info
- Khám phá xử lý ảnh - GVGroup: https://www.facebook.com/groups/ip.gvgroup
Khám phá xử lý ảnh - GVGroup
Danh sách bài viết series OpenCV:
- Hashtag #OpenCV
- Tut 1: Xử lý ảnh - OpenCV đọc ghi hình ảnh (code Python và C++)
- Tut 1.1: Xử lý ảnh - Cấu trúc dữ liệu ảnh trong OpenCV. Pixel là gì?
- Tut 1.2: Xử lý ảnh - Chuyển đổi ảnh OpenCV sang Pillow và ngược lại
- Tut 1.3: Vì sao gốc tọa độ ảnh ở góc trên bên trái?
- Tut 2: Xử lý ảnh - OpenCV resize, crop và padding hình ảnh (code Python và C++)
- Tut 3: Xử lý ảnh - OpenCV biến đổi mức sáng hình ảnh (code Python)
- Tut 4: Xử lý ảnh - OpenCV vùng quan tâm (ROI) là gì? (code Python)
- Tut 4.1: Xử lý ảnh - OpenCV: vẽ văn bản, đường thẳng, mũi tên, hình chữ nhật, hình tròn, ellipse, đa giác
- Tut 4.2: Xử lý ảnh - Pha trộn ảnh trong OpenCV (blending)
- Tut 5: Xử lý ảnh - OpenCV ảnh nhị phân
- Tut 6: Xử lý ảnh - OpenCV cân bằng sáng (histogram equalization)
- Tut 7: Xử lý ảnh - OpenCV kỹ thuật cửa sổ trượt (sliding window)
- Tut 8: Xử lý ảnh - Convolution là gì?
- Tut 9: Xử lý ảnh - Làm mờ ảnh (blur)
- Tut 10: Xử lý ảnh - Gradient của ảnh là gì?
- Tut 11: Xử lý ảnh - Phát hiện cạnh Canny (Canny Edge Detection)
- Tut 12: Xử lý ảnh - Phát hiện đường thẳng bằng Hough Transform (Hough Line)
- Tut 13: Xử lý ảnh - Hiện thực phát hiện đoạn thẳng dùng Hough Transform (Hough Line)
- Tut 14: Xử lý ảnh - Giải thuật phân vùng Region Growing trên ảnh màu
- Tut 15: Xử lý ảnh - Giải thuật Background Subtraction trên ảnh màu
- Tut 16: Xử lý ảnh - Frame Subtraction để phát hiện chuyển động trong video
- Tut 17: Xử lý ảnh - HOG - Histograms of Oriented Gradients
- Tut 18: Xử lý ảnh - HOG - Huấn luyện mô hình phân loại người
- Tut 19: Xử lý ảnh - HOG - Phát hiện người
- Tut 20: Xử lý ảnh - Tổng hợp kinh nghiệm xử lý ảnh (End)
- Tut 21: Xử lý ảnh - Hiện thực trích đặc trưng Local Binary Patterns (LBP)
- Tut 22: Xử lý ảnh - Trích đặc trưng Gabor filters
- Tut 23: Xử lý ảnh - Trích đặc trưng SIFT