HOG - Phát hiện người
OpenCV - tut 19: HOG (part 3)
Kiến thức nền tảng
- Histogram
- Sliding windows
- Convolution
- Đạo hàm ảnh (image gradient)
- HOG - Giải thuật trích xuất đặc trưng
- HOG - Huấn luyện mô hình phân loại người
Bài toán phát hiện đối tượng (object detection)
Bài toán phát hiện đối tượng trong ảnh là bài toán mà ta cần tìm kiếm vị trí của đối tượng có trong ảnh và phân loại đối tượng đó thuộc lớp nào. Đường biên bao quanh đối tượng có thể là hình chữ nhật, tên thường gọi trong tiếng Anh là "bounding box". Do đó, đầu ra của phát hiện đối tượng là vị trí bounding box trên ảnh và nhãn lớp đối tượng của bounding box đó. Bài toán phát hiện người trong ảnh là bài toán phát hiện đối tượng hai lớp: lớp người và lớp background.
Phát hiện người dùng phương pháp HOG (Histograms of Oriented Gradients)
Khi bạn đang đọc đến bài viết này thì thực sự mức độ phức tạp của giải thuật đã tăng lên rất nhiều lần so với bài mở đầu, code cũng đã dài hơn. Minh xin chỉ giải thích những bước lõi để thực hiện phát hiện đối tượng theo phương pháp xử lý ảnh truyền thống dùng kỹ thuật sliding windows:
- Đọc ảnh
- Tiền xử lý / chuẩn hóa. Vd: biến đổi ảnh thành ảnh xám, cân bằng sáng, background subtraction, crop hoặc resize ảnh, … rất nhiều thao tác bạn có thể làm ở đây để việc thực hiện các bước sau đạt kết quả tốt.
- Xây dựng kim tự tháp ảnh multi-scale. Với mỗi scale ảnh từ lớn đến nhỏ (hoặc thứ tự ngược lại), ta sẽ resize ảnh về kích thước của scale ảnh đó. Do bộ lọc convolution / sliding window thường được thiết kế với kích thước cố định, nên việc xử lý trên nhiều scale ảnh cho phép ta phát hiện đối tượng trên nhiều kích thước khác nhau.
- Tại mỗi cửa sổ trượt trên mỗi scale -> crop ảnh cửa sổ ra khỏi ảnh gốc.
- Với ảnh đã crop -> rút trích đặc trưng hình ảnh (feature extraction).
- Phân loại lớp đối tượng theo đặc trưng hình ảnh (classification).
- Như vậy, từ kết quả phân loại ta biết được cửa sổ trượt đang xét là nhãn background hay nhãn đối tượng. Nếu cửa sổ đang xét là đối tượng thì vị trí của cửa sổ đó cũng chính là vị trí bounding box của đối tượng ta đang tìm kiếm.
- Sau khi phân loại tất cả cửa sổ trượt, ta tập hợp các kết quả bounding box được dự đoán là của các loại đối tượng cần phát hiện -> tiến hành áp dụng giải thuật Non Maximum Suppression để chỉ giữ lại box có độ tin cậy cao và loại các box trùng lấp (overlap). Vì ta chỉ muốn kết quả dữ đoán sẽ là: 1 box cho 1 đối tượng.
- Kết thúc bước trên ta có thể visualize các bounding box lên để xem kết quả dự đoán.
Code phát hiện người trong ảnh dùng HOG
requirements.txt: hãy cài đặt các thư viện dependency bổ sung nhé: $ pip3 install -r requirements.txt. Giải thích thêm 1 chút về thư viện scake. Đây là thư viện do Minh tự viết nhằm hỗ trợ việc chạy chương trình thông qua file config theo format YAML. Mình sẽ lần lượt hiện thực các class, đặc tả cấu hình trong file YAML để gắn kết trình tự thực thi chúng lại như ta mong muốn.
Pillow
scikit-learn
scake==0.2.1
run.py: đây là file python đóng vai trò là "entrypoint" của chương trình. Nó sẽ load file config yaml và thực thi theo flow đã đặc tả trong đó.
# -*- coding: utf-8 -*-
import sys
import yaml
from scake import Scake

from hog_feature import HOGFeature
from object_detector import ObjectDetector
from nms import NMS

def main(yaml_path):
    with open(yaml_path) as f:
        config = yaml.safe_load(f)
    s = Scake(config, class_mapping=globals())
    s.run()
    pass

if __name__ == "__main__":
    main(yaml_path="hog.yaml")
hog.yaml: cấu hình file YAML, bạn có thể sửa các item trong "config" và chạy lại chương trình để chơi với nó.
config:
    input_img: 'viet_han.jpg'
    model: 'model_hog_person.joblib'
    image_pyramid: [140, 200, 256]
    window_height: 128
    window_width: 64
    window_step: 16
    prob_threshold: 0.9
    overlap_threshold: 0.4

object_detector:
    $ObjectDetector:
        input_img: =/config/input_img
        image_pyramid: =/config/image_pyramid
        window_step: =/config/window_step
        window_height: =/config/window_height
        window_width: =/config/window_width
        feature_extractor: =/feature_extractor/hog
        model: =/config/model
        prob_threshold: =/config/prob_threshold
        nms: =/nms
    run(): '__call__'

feature_extractor:
    hog:
        $HOGFeature:
            window_height: =/config/window_height
            window_width: =/config/window_width
            cell_size: 8
            block_size: 2
            bins: 9

nms:
    $NMS:
        overlap_threshold: =/config/overlap_threshold
hog_feature.py: class quản lý việc tính feature HOG theo cấu hình đã khởi tạo.
import cv2
import numpy as np
from numpy import linalg as LA

class HOGFeature(object):
    def __init__(self, window_height=128, window_width=64, cell_size=8, block_size=2, bins=9):
        self.window_height = window_height
        self.window_width = window_width
        self.cell_size = cell_size
        self.block_size = block_size
        self.bins = bins
        pass

    def __call__(self, cv_img):
        if len(cv_img.shape) > 2: # convert to gray image
            img = cv2.cvtColor(cv_img, cv2.COLOR_BGR2GRAY)
        else:
            img = cv_img
        h, w = img.shape # 128, 64

        # resize
        if h != self.window_height or w != self.window_width:
            img = cv2.resize(src=img, dsize=(self.window_width, self.window_height))
            h, w = img.shape # 128, 64

        # gradient
        xkernel = np.array([[-1, 0, 1]])
        ykernel = np.array([[-1], [0], [1]])
        dx = cv2.filter2D(img, cv2.CV_32F, xkernel)
        dy = cv2.filter2D(img, cv2.CV_32F, ykernel)

        # histogram
        magnitude = np.sqrt(np.square(dx) + np.square(dy))
        orientation = np.arctan(np.divide(dy, dx+0.00001)) # radian
        orientation = np.degrees(orientation) # -90 -> 90
        orientation += 90 # 0 -> 180

        num_cell_x = w // self.cell_size # 8
        num_cell_y = h // self.cell_size # 16
        hist_tensor = np.zeros([num_cell_y, num_cell_x, self.bins]) # 16 x 8 x 9
        for cx in range(num_cell_x):
            for cy in range(num_cell_y):
                ori = orientation[cy*self.cell_size:cy*self.cell_size+self.cell_size, cx*self.cell_size:cx*self.cell_size+self.cell_size]
                mag = magnitude[cy*self.cell_size:cy*self.cell_size+self.cell_size, cx*self.cell_size:cx*self.cell_size+self.cell_size]
                # https://docs.scipy.org/doc/numpy/reference/generated/numpy.histogram.html
                hist, _ = np.histogram(ori, bins=self.bins, range=(0, 180), weights=mag) # 1-D vector, 9 elements
                hist_tensor[cy, cx, :] = hist
            pass
        pass

        # normalization
        redundant_cell = self.block_size-1
        feature_tensor = np.zeros([num_cell_y-redundant_cell, num_cell_x-redundant_cell, self.block_size*self.block_size*self.bins])
        for bx in range(num_cell_x-redundant_cell): # 7
            for by in range(num_cell_y-redundant_cell): # 15
                by_from = by
                by_to = by+self.block_size
                bx_from = bx
                bx_to = bx+self.block_size
                v = hist_tensor[by_from:by_to, bx_from:bx_to, :].flatten() # to 1-D array (vector)
                feature_tensor[by, bx, :] = v / LA.norm(v, 2)
                # avoid NaN:
                if np.isnan(feature_tensor[by, bx, :]).any(): # avoid NaN (zero division)
                    feature_tensor[by, bx, :] = v

        return feature_tensor.flatten() # 3780 features
        pass
object_detector.py: quá trình phát hiện đối tượng dùng sliding window.
import os
import sys
import time
import operator
import cv2
import numpy as np
from numpy import linalg as LA
from PIL import Image
from sklearn import svm
import joblib # save / load model

class ObjectDetector(object):
    def __init__(self, input_img, feature_extractor, model, nms, image_pyramid=[140, 210, 315, 470], window_step=16, window_height=128, window_width=64, prob_threshold=0.9):
        self.input_img = input_img
        self.image_pyramid = image_pyramid
        self.feature_extractor = feature_extractor
        self.model = model
        self.window_step = window_step
        self.window_height = window_height
        self.window_width = window_width
        self.prob_threshold = prob_threshold
        self.nms = nms

        self.svm_model = joblib.load(self.model)
        pass

    def read_image_with_pillow(self, img_path, is_gray=True):
        pil_im = Image.open(img_path).convert('RGB')
        img = np.array(pil_im)
        img = img[:, :, ::-1].copy()  # Convert RGB to BGR
        img = cv2.cvtColor(img, cv2.COLOR_BGR2GRAY)
        return img

    def fit_svm(self, f):
        # predict
        pred_y1 = self.svm_model.predict(np.array([f]))
        pred_y = self.svm_model.predict_proba(np.array([f]))

        class_probs = pred_y[0]
        max_class, max_prob = max(enumerate(class_probs), key=operator.itemgetter(1))

        is_person = max_class == 1
        return is_person, max_prob

    def nms(self):
        pass

    def __call__(self):
        img = self.read_image_with_pillow(img_path=self.input_img, is_gray=True)
        h, w = img.shape[:2]

        d_img = cv2.imread(self.input_img)

        time_start = time.time()
        n_windows = 0
        boxes = []
        for idx, new_height in enumerate(self.image_pyramid):
            new_width = int(new_height/h*w)

            if self.window_width > new_width or self.window_height > new_height:
                continue

            new_img = cv2.resize(src=img, dsize=(new_width, new_height))
            max_x = new_width - self.window_width
            max_y = new_height - self.window_height

            print('Scale (h=%d, w=%d)' % (new_height, new_width))

            x = 0
            y = 0

            while y <= max_y:
                while x <= max_x:
                    n_windows += 1
                    patch = new_img[y:y+self.window_height,x:x+self.window_width]
                    f = self.feature_extractor(patch)
                    is_person, prob = self.fit_svm(f)

                    if is_person and prob > self.prob_threshold:
                        print('* prob: %.2f' % prob)
                        x1 = int(x/new_width*w)
                        y1 = int(y/new_height*h)
                        x2 = int((x+self.window_width)/new_width*w)
                        y2 = int((y+self.window_height)/new_height*h)
                        #cv2.rectangle(d_img, (x1, y1), (x2, y2), (0, 255, 0), 2)
                        boxes.append([x1, y1, x2, y2])
                    x += self.window_step
                    pass
                x = 0
                y += self.window_step
                pass
            pass

        pboxes = self.nms(np.array(boxes))

        for box in pboxes:
            cv2.imwrite('crop_%s.jpg' % time.time(), d_img[box[1]:box[3], box[0]:box[2], :])

        for box in pboxes:
            cv2.rectangle(d_img, (box[0], box[1]), (box[2], box[3]), (0, 255, 0), 2)

        time_end = time.time()
        print('Processed %d windows in %.2f seconds' % (n_windows, time_end-time_start))
        cv2.imwrite('done.jpg', d_img)

        pass
nms.py: class thực hiện giải thuật Non-Maximum-Suppression (NMS) để thực hiện loại bỏ các box overlap lẫn nhau.
import numpy as np

class NMS(object):
    def __init__(self, overlap_threshold=0.4):
        self.overlap_threshold = overlap_threshold

    def __call__(self, boxes):
        return self.non_max_suppression_fast(boxes=boxes, overlapThresh=self.overlap_threshold)

    # https://www.pyimagesearch.com/2015/02/16/faster-non-maximum-suppression-python/
    # Malisiewicz et al.
    def non_max_suppression_fast(self, boxes, overlapThresh):
        # if there are no boxes, return an empty list
        if len(boxes) == 0:
            return []

        # if the bounding boxes integers, convert them to floats --
        # this is important since we'll be doing a bunch of divisions
        if boxes.dtype.kind == "i":
            boxes = boxes.astype("float")

        # initialize the list of picked indexes
        pick = []

        # grab the coordinates of the bounding boxes
        x1 = boxes[:,0]
        y1 = boxes[:,1]
        x2 = boxes[:,2]
        y2 = boxes[:,3]

        # compute the area of the bounding boxes and sort the bounding
        # boxes by the bottom-right y-coordinate of the bounding box
        area = (x2 - x1 + 1) * (y2 - y1 + 1)
        idxs = np.argsort(y2)

        # keep looping while some indexes still remain in the indexes
        # list
        while len(idxs) > 0:
            # grab the last index in the indexes list and add the
            # index value to the list of picked indexes
            last = len(idxs) - 1
            i = idxs[last]
            pick.append(i)

            # find the largest (x, y) coordinates for the start of
            # the bounding box and the smallest (x, y) coordinates
            # for the end of the bounding box
            xx1 = np.maximum(x1[i], x1[idxs[:last]])
            yy1 = np.maximum(y1[i], y1[idxs[:last]])
            xx2 = np.minimum(x2[i], x2[idxs[:last]])
            yy2 = np.minimum(y2[i], y2[idxs[:last]])

            # compute the width and height of the bounding box
            w = np.maximum(0, xx2 - xx1 + 1)
            h = np.maximum(0, yy2 - yy1 + 1)

            # compute the ratio of overlap
            overlap = (w * h) / area[idxs[:last]]

            # delete all indexes from the index list that have
            idxs = np.delete(idxs, np.concatenate(([last],
                np.where(overlap > overlapThresh)[0])))

        # return only the bounding boxes that were picked using the
        # integer data type
        return boxes[pick].astype("int")
Tất cả các file để trong cùng 1 thư mục. Đến đây mình đã có đủ source code để chạy chương trình phát hiện người. 2 file còn thiếu còn lại đó là ảnh mẫu và mô hình đã train. Mình sẽ dùng lại pretrained model lấy từ bài post trước.
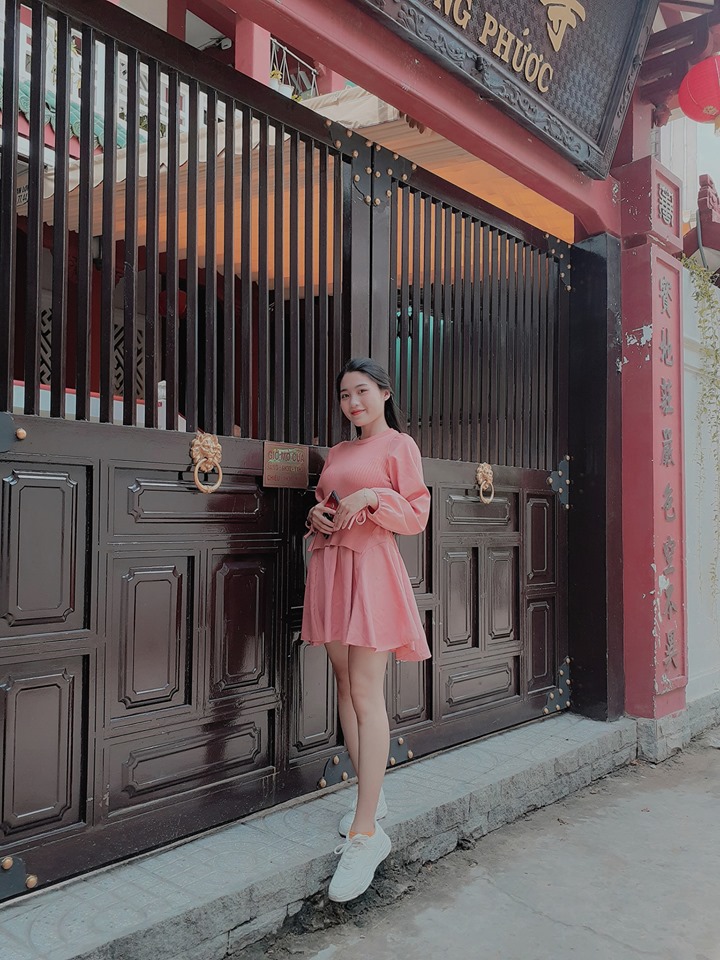
viet_han.jpg: ảnh mẫu để xử lý. Nếu bạn muốn "xử" ảnh khác thì có thể sửa đường dẫn trong file YAML @ config > input_img
model_hog_person_190901 (139MB): https://drive.google.com/open?id=10pWk-Hoii_tzEErwyZwJAZsycGorqzXv (link bitly, trỏ đến GDrive để download, 100% không chứa quảng cáo khi click vào link)
Câu lệnh để chạy chương trình phát hiện người trên ảnh:
$ python3 run.py
Ảnh kết quả:
done.jpg: bounding box vẽ trên ảnh là kết quả dự đoán. Sai box ngay cửa, đúng box người. Nguyên nhân sai đơn giản là nguồn dữ liệu của mô hình đã học chưa đủ lớn, kiểu cánh cửa này chưa bao giờ được là nhãn âm trong tập dữ liệu (mô hình chưa "nhìn thấy" nó bao giờ).

HOG cho ứng dụng thực tế?!
Minh xin mạn phép (lịch sự quá :">) trả lời theo kiểu Q/A nha, thẳng và thật theo quan điểm cá nhân của mình:
Q1: Code HOG phát hiện người M cung cấp trong bài viết tốc độ xử lý là bao nhiêu?
A1: Mất 7-10s cho 1 hình trên laptop. Cấu hình mặc định: 3 scale ảnh, sliding window step = 16px.
Q2: Độ chính xác của mô hình trong bài của M là bi nhiêu?
A2: M chưa đánh giá, nhưng test định tính vài ảnh thì còn nhầm lẫn background thành người quá nhiều.
Q3: Thế tui có thể dùng code này cho triển khai ứng dụng thực tế được không?
A3: Không. Lý do: xem A1 và A2.
Q4: Vậy đưa tui xem làm cái giề, mất thời gian quá >__<"
A4: Mục đính chính là để học, nắm rõ quy trình chứ M không đưa bạn code ăn liền, xài liền và không hiểu gì cả!
Q5: Có thể cải thiện những gì để mô hình "thông minh" hơn?
A5: Huấn luyện mô hình tốt hơn. Nên follow một cách chi tiết theo bài báo gốc HOG (M hiện thực vội nên có thể 1 số step chọn và xử lý dữ liệu để train chưa thực sự chuẩn). Tiến hành đánh giá định lượng để nắm chắc mô hình mình tự hiện thực và huấn luyện đã xấp xỉ bài báo gốc hay chưa, lúc này mới có thể kết luận.
Q6: Muốn đem phương pháp này vào chạy thực tế thì CẦN làm thêm những gì?
A6: Không phải là không khả thi mà còn phải làm nhiều cái. Trong đó phần lớn công việc sẽ là nâng cấp độ chính xác của mô hình (giải quyết Q2) và tối ưu hóa tốc độ xử lý (giải quyết Q1). Một số ý tưởng cho việc cải thiện tốc độ xử lý: xử lý multi-thread, hiện thực C/C++ thay vì Python, optimize một số phần xử lý để có thể tính toán trên GPU, kết hợp Frame Subtraction (cho xử lý video) và Region of Interest (ROI) để giới hạn vùng quan tâm, …
Q7: Bài dài quá rồi, kết thúc được chưa?
A7: OK.
Cảm ơn bạn đã theo dõi bài viết. Hãy kết nối với tớ nhé!
- Minh: https://www.facebook.com/minhng.info
- Khám phá xử lý ảnh - GVGroup: https://www.facebook.com/groups/ip.gvgroup
Khám phá xử lý ảnh - GVGroup
Danh sách bài viết series OpenCV:
- Hashtag #OpenCV
- Tut 1: Xử lý ảnh - OpenCV đọc ghi hình ảnh (code Python và C++)
- Tut 1.1: Xử lý ảnh - Cấu trúc dữ liệu ảnh trong OpenCV. Pixel là gì?
- Tut 1.2: Xử lý ảnh - Chuyển đổi ảnh OpenCV sang Pillow và ngược lại
- Tut 1.3: Vì sao gốc tọa độ ảnh ở góc trên bên trái?
- Tut 2: Xử lý ảnh - OpenCV resize, crop và padding hình ảnh (code Python và C++)
- Tut 3: Xử lý ảnh - OpenCV biến đổi mức sáng hình ảnh (code Python)
- Tut 4: Xử lý ảnh - OpenCV vùng quan tâm (ROI) là gì? (code Python)
- Tut 4.1: Xử lý ảnh - OpenCV: vẽ văn bản, đường thẳng, mũi tên, hình chữ nhật, hình tròn, ellipse, đa giác
- Tut 4.2: Xử lý ảnh - Pha trộn ảnh trong OpenCV (blending)
- Tut 5: Xử lý ảnh - OpenCV ảnh nhị phân
- Tut 6: Xử lý ảnh - OpenCV cân bằng sáng (histogram equalization)
- Tut 7: Xử lý ảnh - OpenCV kỹ thuật cửa sổ trượt (sliding window)
- Tut 8: Xử lý ảnh - Convolution là gì?
- Tut 9: Xử lý ảnh - Làm mờ ảnh (blur)
- Tut 10: Xử lý ảnh - Gradient của ảnh là gì?
- Tut 11: Xử lý ảnh - Phát hiện cạnh Canny (Canny Edge Detection)
- Tut 12: Xử lý ảnh - Phát hiện đường thẳng bằng Hough Transform (Hough Line)
- Tut 13: Xử lý ảnh - Hiện thực phát hiện đoạn thẳng dùng Hough Transform (Hough Line)
- Tut 14: Xử lý ảnh - Giải thuật phân vùng Region Growing trên ảnh màu
- Tut 15: Xử lý ảnh - Giải thuật Background Subtraction trên ảnh màu
- Tut 16: Xử lý ảnh - Frame Subtraction để phát hiện chuyển động trong video
- Tut 17: Xử lý ảnh - HOG - Histograms of Oriented Gradients
- Tut 18: Xử lý ảnh - HOG - Huấn luyện mô hình phân loại người
- Tut 19: Xử lý ảnh - HOG - Phát hiện người
- Tut 20: Xử lý ảnh - Tổng hợp kinh nghiệm xử lý ảnh (End)
- Tut 21: Xử lý ảnh - Hiện thực trích đặc trưng Local Binary Patterns (LBP)
- Tut 22: Xử lý ảnh - Trích đặc trưng Gabor filters
- Tut 23: Xử lý ảnh - Trích đặc trưng SIFT